How to Replace a Light Switch
A light switch is often overlooked at how important it is around the house, until it no longer works correctly. When that happens, it is an easy task for any do-it-yourselfer to change out the broken light switch with a new one.
First thing to do is to figure out the type of light switch you will be working with.
There exist three varieties of light switch, a one-way switch, a two-way switch and an intermediate switch. All switches are rated at either 6 or 10 amps.
 A one-way switch controls a light or lights from one position, usually by a door. A two-way switch is going to have a partner so that a light can be turned on and off from two positions, say by the kitchen door and the back door. An intermediate switch is utilized whenever the light is to be switched on or off from three positions or even more.
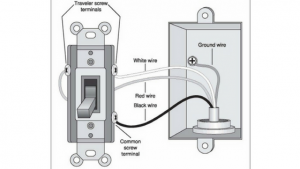
A one-way switch will have two terminals on the back for the wire connections, a two-way will have three and an intermediate will have four.
The first step to changing the switch, first turn on the light and then pull out or shut off the fuse or mcb, that will guarantee you have got the appropriate circuit, if the light goes out. Place the fuse in your pocket or tape down the mcb to ensure that it cannot be re-energized.
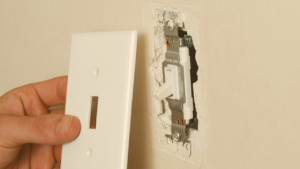
 Take off the switch plate from the wall by removing the two screws and pull it gently towards you. If it sticks to the wall, with the screws removed, it has probably been painted in place, so carefully run a razor knife around the plate to break the seal. You can at this point observe the connections in the back.
At this point is an excellent time to make a note, a sketch, or even a picture of where the electrical wires are attached. Should you have a similar switch the terminations will be a straight replacement but if it looks different then make these notes.
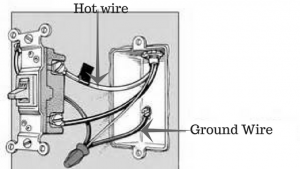
The majority of switches comply with the same format for marking. ‘C’ for common, L1 and L2 for the others. One a one way switch the common is going to be the red/brown wire and L1 is going to take the black/blue wire with a short identifier of brown or red sleeving or tape.
With a two way switch it is not out of the ordinary to have five wires connected into the back. Making a note is highly suggested. The five wires are going to be split up into two pairs along with a common. The two pairs can be placed into either L1 or L2, it will not matter but the single wire must go into the common or the switch is useless.
 After you remove the switch you will see some blue or black wires attached into a block, these are the neutrals and should never be hooked up to the other live wires otherwise you can cause an electrical short along with a small bang.
The earth or cpc wires can be left alone as well unless you are installing a metal switch in which case you must create a connection to the plate to the terminal supplied. This can easily be accomplished with a short bit of copper wire, ideally sleeved with green.
After you have made all the connections and are comfortable that they are accurate, carefully place the switch into the box, making certain all the wires are pushed clear of the screw positions and screw it down securely. Then replace the switch cover, or put a new one on and securely screw that into position.
Follow these tips and changing a light switch will not seem to be that difficult.


Comments are closed, but trackbacks and pingbacks are open.